AMD (Xilinx) Kria KV260, KR260用 Vitis Unified IDE Stand alone (Bare metal) テンプレート・プロジェクト
2024/11/27 Vitis 2024.2に対応しました。
2023/11/19 新規公開
これはAMD (Xilinx) Kria KV260, KR260で開発を始めるためのテンプレート・プロジェクト生成スクリプトです。各ボード向けの最小限の構成がセットアップされ、サンプルとしてLチカ(rtl_top.v)が実装されます。
rtl_top.vをトップにしてHDLをコーディングするだけで開発を始められます。
VitisのStand alone (Bare metal) アプリケーション形式で構成しているのでLinuxやFSBLの設定が必要なく、ホストPCからUSB経由で直接FPGAをコンフィグして実行することができます。
Vivado / Vitis Ver.2023.2以降のVitis Unified IDEが対象です。
AMD Kria KV260, KR260用テンプレート・プロジェクト(Lチカ)
ダウンロード: Vitis_KV260_KR260_Template.tar.gz(ライセンス:パブリックドメイン)
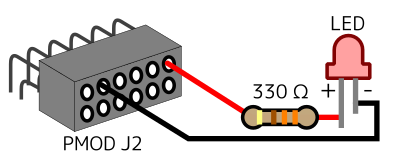
このプロジェクト(Lチカ)では、ボードに接続したLEDを光らせます。LEDと330Ωの抵抗を下記のようにボードのPMOD J2に接続します。
上記のファイル(vitis_template.tar.gz)を展開します。デフォルトではKV260用のプロジェクトが生成されます。KR260の場合は、vivado.tclの「set board_type kv260」を「set board_type kr260」に書き換えます。
PC上のLinux (Ubuntu等) のターミナルで実行する方法
PC上のLinux (Ubuntu等) にVivado / Vitisをインストールしている環境の場合、makeコマンドだけでプロジェクトの作成から合成まで行えます。
Linuxのターミナルで
$ source Vitisのインストールパス/settings64.sh
(例: $ source /opt/Xilinx/Vitis/2023.2/settings64.sh )
$ cd このディレクトリのパス
$ make
もしくは、以下のように各工程を別々に行うこともできます。
$ make vivado
(Vivadoプロジェクトの作成)
$ make vivado-run
(Synthesis, Implement, Export HW)
$ make vitis
(Vitis Unified IDEのプロジェクト作成、ビルド)
実行方法
Vitis Unified IDEを起動し、
File: Open Workspaceで
(このディレクトリ)/vitis_workspace を選択してOK
View: Flow を選択して表示、
FLOW: Component で Project_1_appを選択、
FLOW: Run で実行します。
Vivado, Vitis IDEで実行する方法
Vivadoでメニュー: Window: Tcl Consoleを開きます。
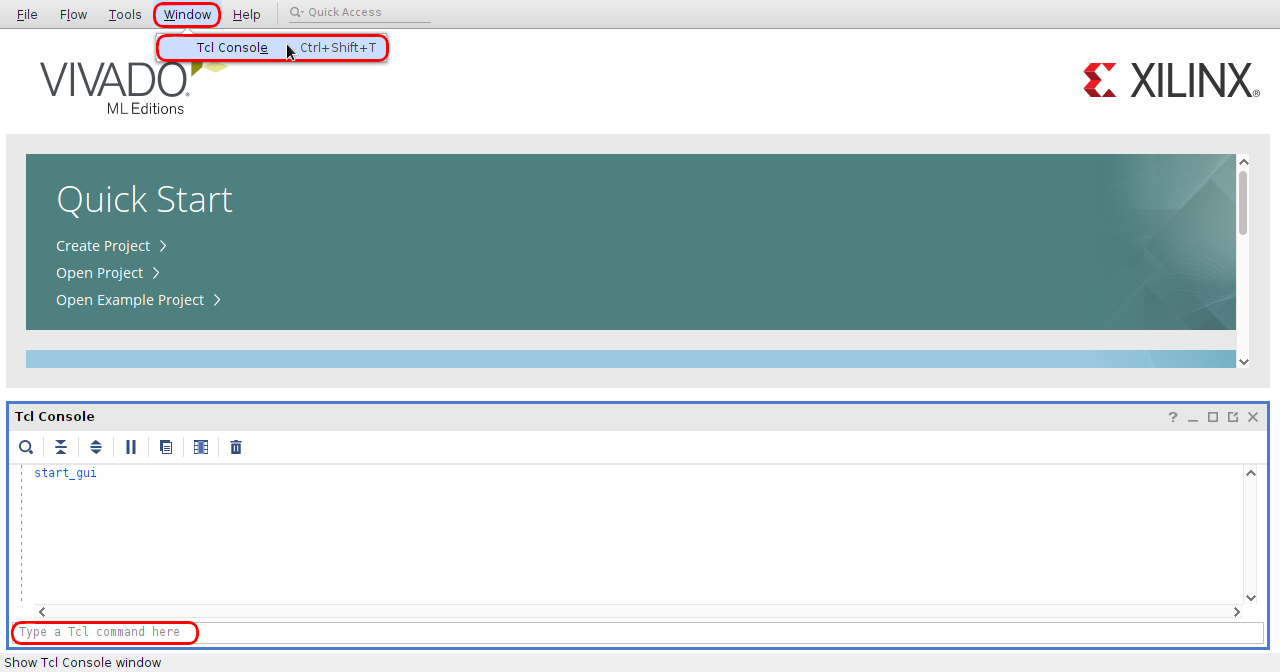
Tcl Consoleで、
pwd
(カレントディレクトリを確認)
cd 展開したファイルのパス(Vitis_KV260_KR260_Template)
(vivado.tclのあるディレクトリに移動)
source vivado.tcl
(プロジェクト作成スクリプトを実行)
しばらく待つとプロジェクトが作成されます。
source vivado-run.tcl
(Synthesis, Implement, Export Hardwareのスクリプトを実行)
project_1/design_1_wrapper.xsa にプロジェクトがエクスポートされます。
Vitis Unified IDEでメニュー: Terminal: New Terminalを開きます。

Terminalで、
pwd
(カレントディレクトリを確認)
cd 展開したファイルのパス(Vitis_KV260_KR260_Template)
(vitisnew.pyのあるディレクトリに移動)
vitis -s vitisnew.py
(Vitisプロジェクト生成スクリプトを実行。ビルドも自動実行される)
File: Open Workspaceで
vitis_template/vitis_workspace を選択してOK
View: Flow を選択して表示、
FLOW: Component で project_1_appを選択、
FLOW: Run で実行します。
補足情報
RTLのサブモジュールの更新について
rtl_top.v の下位モジュールのソースコードのみを修正した時、Vivado上で更新情報が正常に取得されない場合があります。その場合、rtl_top.v にコメントの追加等でダミーの修正を行うとVivadoで捕捉されて「Refresh Changed Modules」が表示されるのでそれをクリックするとソースツリーの再読込とリセットが行われます。
例: // rev. 1 (2, 3, ...)
ソースコード
vivado.tcl : Vivadoのテンプレート・プロジェクトを生成するスクリプト
set rtl_top_name rtl_top
set rtl_files {rtl_top.v}
set pin_xdc_file {pins.xdc}
set timing_xdc_file {timings.xdc}
set project_name project_1
set project_dir project_1
set design_name design_1
set ps_ip xilinx.com:ip:zynq_ultra_ps_e
set ps_name zynq_ultra_ps_e_0
set init_rule xilinx.com:bd_rule:zynq_ultra_ps_e
set rtl_top_instance ${rtl_top_name}_0
if { $board_type eq "kr260" } {
set board_parts [get_board_parts "*:kr260_som:*" -latest_file_version]
set som_connection {som240_1_connector xilinx.com:kr260_carrier:som240_1_connector:1.0 som240_2_connector xilinx.com:kr260_carrier:som240_2_connector:1.0}
} else {
set board_parts [get_board_parts "*:kv260_som:*" -latest_file_version]
set som_connection {som240_1_connector xilinx.com:kv260_carrier:som240_1_connector:1.3}
}
# create project
create_project -name $project_name -force -dir $project_dir -part [get_property PART_NAME $board_parts]
set_property board_part $board_parts [current_project]
add_files -fileset constrs_1 -norecurse $pin_xdc_file
add_files -fileset constrs_1 -norecurse $timing_xdc_file
set_property used_in_synthesis false [get_files $timing_xdc_file]
add_files -fileset sources_1 -norecurse $rtl_files
set_property board_connections $som_connection [current_project]
create_bd_design $design_name
current_bd_design $design_name
set top_instance [get_bd_cells /]
current_bd_instance $top_instance
# config bd
create_bd_cell -type ip -vlnv $ps_ip $ps_name
apply_bd_automation -rule $init_rule -config {apply_board_preset "1"} [get_bd_cells $ps_name]
set_property -dict [list \
CONFIG.PSU__USE__M_AXI_GP0 {0} \
CONFIG.PSU__USE__M_AXI_GP1 {0} \
CONFIG.PSU__USE__IRQ0 {0} \
CONFIG.PSU__FPGA_PL1_ENABLE {0} \
] [get_bd_cells $ps_name]
create_bd_cell -type ip -vlnv xilinx.com:ip:clk_wiz:6.0 clk_wiz_0
set_property -dict [list \
CONFIG.PRIM_SOURCE {Global_buffer} \
CONFIG.RESET_TYPE {ACTIVE_LOW} \
] [get_bd_cells clk_wiz_0]
create_bd_cell -type module -reference $rtl_top_name $rtl_top_instance
# port connection
connect_bd_net [get_bd_pins clk_wiz_0/clk_in1] [get_bd_pins ${ps_name}/pl_clk0]
connect_bd_net [get_bd_pins clk_wiz_0/resetn] [get_bd_pins ${ps_name}/pl_resetn0]
connect_bd_net [get_bd_pins ${rtl_top_instance}/clk] [get_bd_pins clk_wiz_0/clk_out1]
connect_bd_net [get_bd_pins ${rtl_top_instance}/resetn] [get_bd_pins clk_wiz_0/locked]
make_bd_pins_external [get_bd_pins ${rtl_top_instance}/led]
# make wrapper
current_bd_instance $top_instance
make_wrapper -files [get_files $project_dir/${project_name}.srcs/sources_1/bd/$design_name/${design_name}.bd] -top
add_files -norecurse $project_dir/${project_name}.gen/sources_1/bd/$design_name/hdl/${design_name}_wrapper.v
set_property top ${design_name}_wrapper [current_fileset]
update_compile_order -fileset sources_1
validate_bd_design
regenerate_bd_layout
save_bd_design
vivado-run.tcl : VivadoでSynthesis, Implement, Export Hardware(xps)を実行するスクリプト
set project_dir $project_name
set project_file $project_dir/$project_name.xpr
set design_name design_1
set xsa_file $project_dir/${design_name}_wrapper.xsa
set rtl_top_name rtl_top
if {[catch {current_project}]} {
open_project $project_file
} else {
puts "The project is already opened."
}
set rtl_top_filter "*${rtl_top_name}*"
config_ip_cache -disable_for_ip [get_ips $rtl_top_filter]
update_module_reference [get_ips $rtl_top_filter]
update_compile_order -fileset sources_1
reset_run synth_1
reset_run impl_1
launch_runs synth_1
wait_on_run synth_1
launch_runs impl_1 -to_step write_bitstream
wait_on_run impl_1
write_hw_platform -fixed -force -include_bit -file $xsa_file
validate_hw_platform -verbose $xsa_file
vitisnew.py : Vitis Unified IDEでXSAからのプロジェクト作成、ビルドを行うスクリプト
import vitis, json, os, shutil, re
project_name = 'project_1'
platform_name = project_name + '_pf'
app_name = project_name + '_app'
domain_name = 'standalone_psu_cortexa53_0'
xsa_path = project_name + '/design_1_wrapper.xsa'
vitis_src_path = 'vitis_src'
workspace_path = 'vitis_workspace'
boot_bsp_n = False
use_template = True
template_name = 'hello_world'
if use_template == False:
template_name = 'empty_application'
if os.path.exists(workspace_path):
shutil.rmtree(workspace_path)
try:
os.mkdir(workspace_path)
except:
pass
vitis_version = os.path.basename(os.environ.get('XILINX_VITIS'))
client = vitis.create_client()
client.set_workspace(path = workspace_path)
# create platform
if re.match('2023', vitis_version):
platform = client.create_platform_component(name = platform_name, hw = xsa_path, os = 'standalone', no_boot_bsp = boot_bsp_n)
else:
platform = client.create_platform_component(name = platform_name, hw_design = xsa_path, os = 'standalone', no_boot_bsp = boot_bsp_n)
# add domain
domain = platform.add_domain(name = domain_name, cpu = 'psu_cortexa53_0', support_app = template_name)
platform.build()
# create app
if re.match('2023', vitis_version):
platform_xpfm = platform.project_location + '/export/' + platform_name + '/' + platform_name + '.xpfm'
else:
platform_xpfm = client.find_platform_in_repos(platform_name)
app = client.create_app_component(name = app_name, platform = platform_xpfm, domain = domain_name, template = template_name)
if use_template == False:
app.import_files(from_loc = vitis_src_path, dest_dir_in_cmp = 'src')
app.build()
# modify launch settings
launch_json_path = workspace_path + '/' + app_name + '/_ide/launch.json'
if re.match('2023', vitis_version) or re.match('2024.1', vitis_version):
launch_json_path = workspace_path + '/' + app_name + '/_ide/.theia/launch.json'
fr = open(launch_json_path, 'r')
d0 = json.load(fr)
fr.close
d1 = d0['configurations'][0]['targetSetup']['zuInitialization']
d1['isFsbl'] = False
d1['usingPsuInit']['plPowerup'] = True
fw = open(launch_json_path, 'w')
json.dump(d0, fw, indent = '\t')
fw.write('\n')
fw.close